 Skip to content
A Sprinkler System Layout Guide
A few facts about sprinklers:
Sprinklers will not water around corners or through obstructions. No exceptions!

It's easy to forget that sprinklers won't water around objects, in the enthusiasm of planting your garden and watching it grow. But when plants grow bigger, they can "mask" areas of garden that your sprinklers watered in the beginning.
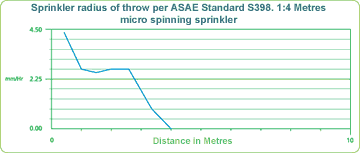
Water is propelled OUT from the sprinkler, not directly down, so there is minimal watering at the base of the sprinkler.
The LAST THIRD of the sprinkler radius has, on average, about HALF the precipitation (watering) rate of the first two-thirds of the radius, even though it looks like most of the water is going to the outer extremes.
Sprinkler Radius
Diagram 1:

Diagram 2:
For this reason when watering from one side only, the last 1/3 of the sprinkler's radius would have to be thrown outside the area to enable reasonable watering within the area.
One sprinkler on its own will not water an area very evenly. This is less obvious in a garden but very noticeable in a lawn where dry areas will appear. The only way to eliminate these dry areas is to use combinations of sprinklers while also following the basic sprinkler layout guidelines.
This uneven watering can be mostly overcome by 'head-to-head' watering, where your sprinklers must overlap by at least 100% along your Pipe run. This means a sprinkler with a 4 metre radius (throw) should be no more than 4 metres away from the next sprinkler.
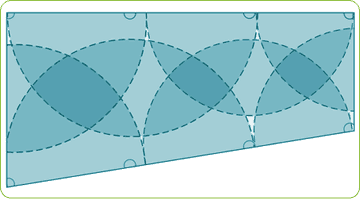
Diagram 3:

This 'one-sided watering' diagram shows how the water from one sprinkler hits the next sprinkler which eliminates the dry spot at the base of that sprinkler, however the last third of the sprinkler's radius would still have to be thrown outside the area to enable reasonable watering within the area. Also note that with this 100% overlap some areas still only receive water from one sprinkler which is often less than adequate, and a better result will come from putting your sprinklers even closer together.
Sprinkler layout:
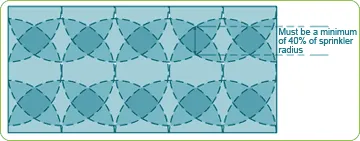
The most common design layout of sprinklers is called 'head-to-head watering' where the spray from one sprinkler hits the next sprinkler on the head. An added benefit to this style of sprinkler layout is that when this method is applied using part circle sprinklers around the perimeter of an area, the water can be completely contained within the area, which means minimal wastage.
Diagram 4:

This diagram shows an alternative sprinkler combination, where sprinklers are put along both sides of the area-no wastage!
The previously mentioned general 'head-to-head' layout is suitable for REGULAR SHAPED areas; however, when an area is an ODD SHAPE, sprinklers should be laid out so that the spray from the first sprinkler hits the spray from the third sprinkler, and so on down the line.
Odd shaped areas will generally involve a sprinkler throwing short or beyond the next sprinkler lengthwise along an area.
Diagram 5:
Another sprinkler layout concern is where an area is wider than the radius of the sprinkler and will therefore require two or more runs of sprinklers. Ideally, if you maintain the head-to-head layout along the length of the area, you can stretch the spacing across the area so that the next run of sprinklers should be no more than an extra 1/3 of the sprinkler radius away (e.g. if a sprinkler had a radius of 6mt, then the next run of sprinklers should be no more than 8mt away).
Diagram 6:
If your sprinkler runs are too far apart, you may create an area through the middle of this overlap that is dry in appearance compared with the rest of the area. This situation is due to the lighter precipitation zone at the extremes of the sprinkler radius as previously mentioned.